Showing posts with label Camping. Show all posts

Sunday, January 06, 2019

Muskallonge Lake Camping Again....and Mom's Tasty Flank Steak

This year, we have planned our annual camping trip with our neighbors Ann and Bill at Muskallonge Lake State Park, which is near Grand Marais in the eastern upper peninsula.    It's a great park - we stayed there almost 9 years ago when we had our pop up camper with the kids.     Grand Marais, if you have never been, is a funky little town, best known as a hangout for Jim Harrison.   His soul brother Ernest Hemingway liked the area, he wrote the short story Big Two Hearted River (although in actuality he set the story in Seney, MI but he liked the name better).   And then there is the best beer in America, Bell's Two Hearted.   It's a great campground, but I hope we have better weather this trip.


Last time we were there, I made this recipe in the dutch oven.  It is a favorite in our house.   Serve it over noodles.   Delicious!

Mom's Tasty Flank Steak

Marinade
1/2 c. soy sauce
1/4 c. olive oil
1/4 c. lemon juice - bottled is fine for this recipe
1 T. thyme
3 green onions, sliced
A big flank steak

Place marinade ingredients in a plastic bag, and add steak. Freeze in marinade, and pack it in your cooler. (if you are making this at home, marinate it in the fridge overnight) At camp, put the beef and marinade in a 12 inch dutch oven with 10 coals on the bottom, 14 on top for about 30 minutes. (at home, broil it in a pan with the marinade until desired doneness) Serve with noodles. Yummy!

Friday, June 27, 2014

Camping Pot Roast for 30

This past weekend, I went whitewater rafting at the New River Gorge in West Virginia with my son's Boy Scout troop.  It was a total blast!


It rained a little bit the last day we were there - the scouts went ziplining; I stayed back in camp to make pot roast in our dutch ovens.  Pot roast is an excellent choice for a dutch oven dinner; it takes a long time but is very forgiving and can serve a lot of people if you have to do so.  I made it with extra au jus so we could have it "French Dip" style on french bread rolls.


Dutch Oven Pot Roast
This serves about 6 people, multiply by 5 to serve 30.  I made enough beef for 30 in a 12 inch and 14 inch Dutch oven.  

3 lb chuck eye roast
1/4 c. flour
salt and pepper
3 T vegetable oil
3 onions, sliced
2 carrots, peeled and cut in chunks
1 large carton beef broth
2 bay leaves
Crusty rolls or bread, for dipping

Heat a chimney of coals until the top ones are ashy, about 20 minutes.   In a plastic bag, shake roast, flour, salt and pepper until the roast is covered in flour.   When the coals are hot, empty about half of them into the fire pit, and heat the dutch oven until the bottom is hot, add the oil and brown the meat on each side.   Remove the meat, and then add the vegetables and place the meat on top; add broth and the bay leaves and cover.   Pour about half the remaining coals on the top of the oven and arrange them evenly on the top, and then refill the charcoal chimney with new coals to heat up.  Cook until the beef is tender; about 2 hours, replenishing with hot coals as needed on top and bottom, and rotating the pot and lid every 20 minutes or so to assure even cooking. Charcoal usually only stays hot about 30 minutes, so always keep some in the chimney heating up so you have it when you need it.  If I can hold my hand a couple inches over the coals for longer than 5 seconds, I know it's time to add more coals.   Serve sliced on crusty rolls with the broth for dipping.  

Sunday, July 07, 2013

Camp Cooking: Dutch oven Potatoes and Mountain Man Breakfast

Camp cooking, as in real life cooking, can be made even better by squeaking 2 meals out of one...you know, make the Thanksgiving turkey, and then follow it up leftovers later in the week with turkey soup .  I just remembered this recipe - I am going to have to make it with my left over roast chicken I am planning to make later this week.  It's a great recipe.  But let's get back to camp....the next recipe to try is potatoes for dinner.   Potatoes are a little harder than chili because there is no liquid in them, but just remember to count coals and rotate the lid and oven every 15 minutes and you will be fine.

Dutch Oven Potatoes
serves 4 people with some leftovers
12 inch Dutch oven

6 Russet potatoes, cut in 1 inch cubes
4 cloves garlic, minced
3 T. olive oil
kosher salt (to taste)
1 t. dried rosemary (optional) 

Heat 24  charcoal briquettes in a charcoal chimney until they're gray.   Meanwhile cut up the potatoes and mince the garlic.   In the Dutch oven, mix potatoes, garlic oil and salt.  Also good is to add some rosemary, if you have it in your camp box.   Cook for 30 minutes in a dutch oven with 9 charcoals on the bottom, 15 on top, rotating the lid and oven every 15 minutes.    Save a cup or so for breakfast the next morning - store in camp cooler.

Making eggs in a Dutch oven is a little bit harder because they can burn fairly easily.   But this recipe is a camp favorite of my family, as well as every Boy and Girl Scout I've had the pleasure to camp with.   Just keep an eye on them and they will come out perfect.   Plus the smell of the bacon, onions and peppers cooking will draw even the teenagers used to sleeping in until high noon out of their tents.  The bugler will not even have to blow Reveille to get them up.


Mountain Man Breakfast
serves 4
12 inch oven

1/2  lb bacon, diced*
1 green pepper, diced*
cloves garlic
1 onion, diced*
1 cup leftover potatoes from the night before, or small bag of frozen hash browns
8 eggs, beaten lightly
1 cup cheddar cheese
salt and pepper

*can dice and freeze at home before the trip

Heat a full chimney of charcoal briquette until gray. Put about half in the fire pit, and cook bacon until brown, stirring often.  Don't put the lid on.   Add some more coals - leaving some in the chimney to start heating 15 coals to use later.   Cook the vegetables, cook until soft, stirring often.  If using frozen hash browns, add them now and heat until they are thoroughly thawed.  Check the heat on the coals - if you can't keep your hand above it for 5 seconds, it's too hot.  Spread some of the coals out to cool things off a little.  

Add eggs and cheese and leftover potatoes, if not using hash browns, and  salt and pepper and replace lid. Top with 15 coals and cook for 20 minutes or until eggs are done.  Rotate lid and oven halfway through - checking to see if the eggs are burning.  If things seem to be getting a little too hot, you can always take the lid off but remember, Dutch ovens retain heat even after you take them off the coals, so it's always better to err on the side of caution.   Sometimes, I will cook the eggs until they are almost set, but still liquidy in the center, and then take the oven off the coals and take the coals off the lid and replace the lid and let it sit  for 5 minutes or so while I brew a pot of coffee.   They will be done perfectly by the time the coffee is ready. 

Next up, we'll discuss the most difficult part of Dutch oven cooking - the baking.   However, have no fear and count your coals and everything will come out fine.  

Saturday, July 06, 2013

Camp Cooking: How to cook using a Dutch Oven

Dutch oven cookery is one of the best ways to cook while camping.   Anyone that has a Dutch oven in their home kitchen can appreciate how they are a true workhorse in any cooking arsenal - and the same is true of   a camping Dutch oven.  Virtually anything that can be made in a slow cooker or an oven can be made outdoors in a Dutch oven.


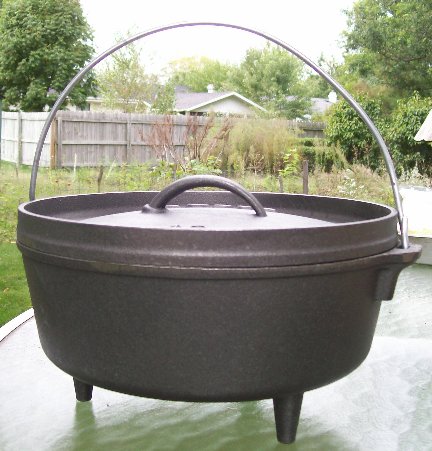
Camping Dutch ovens are different from the one you might have in your kitchen - they have legs, a lid with a rim and a bale type lid.  For camp cooking, I like a Lodge preseasoned Dutch oven - they are ready to use and are made of cast iron for excellent heat transfer.    It's essential to use charcoal briquettes to adequately control the temperature - anyone that's had a bad experience from Dutch oven cookery can tell you it's really easy to burn food in one.   Cast iron retains heat really well.   Buy charcoal that is in briquette form and has not been treated with accellerants; store brands work just fine and are relatively inexpensive.   Also it's essential to use a charcoal chimney to get the coal hot.  


I first learned about charcoal chimneys from Alton Brown and they are an excellent tool for grilling and camping - to get the coals hot, just fill it up and crumple 2 sheets of newspaper under it and light.   In about 20 minutes or so (could be longer if it is damp out) the coals will be gray and hot and ready for cooking.   A couple other things that are nice to have for Dutch oven cooking are a lid lifter and welding gloves, although a pair of pliers and oven mitts can be used to open the lid and hold the handle.

To control heat during Dutch oven cooking, it's important to count charcoal - I like to use the "Dutch oven rule of 3".   The amount of coal needed is 2x the diameter of the oven (usually cast in the lid) - for a 12 inch oven it's 24.  Since heat rises, you need more heat on the top than the bottom, so put 3 more coals on top than on the bottom; i.e. 15 on the top and 9 on the bottom.   This will give you a temp of about 350F, which is what most foods are cooked at in an oven.   A batch of coal on the oven will stay hot for about 30 minutes - if you are cooking a recipe that needs more time, you will need to refresh the coals.   There are many theories for how to arrange the coals under the oven and on top; I find evenly spacing them works fine, as shown above.   The goal is to minimize hot spots.  During cooking, rotate the oven a quarter turn  clockwise  on the bottom  coals and rotate the lid counterclockwise a quarter turn every 15 minutes to insure even heat distribution.

The best type of recipe to start out with is a chili, soup or stew, because it's very forgiving and hard to burn.  A good recipe to start out with is my white chicken chili recipe.  Also, it's time for me to debunk some popular posts on Pinterest about camping.   One I keep seeing is this tip to store camping spices in Tic Tac containers.


Whoever wrote this original tip must have a serious Tic Tac addiction and must not cook very often in real life!  This is more Tic Tacs than I personally have eaten in a lifetime....but even more problematic is that it would be difficult to get the spices out of the containers using the little Tic Tac hole, and who wants their spices to taste minty?  Lastly, the volume of a Tic Tac box just isn't feasible for a lot of spices - sure, maybe nutmeg or cayenne might work in such a small container, where only a small amount is needed for a recipe, but for other things like chili powder, oregano, garlic powder, that amount might not even be good for one recipe.   I store camp spices individually in zip lock bags - the snack size work great! I put all of my spice baggies into a plastic Glad container.   So skip the Tic Tacs....

The other Pinterest favorite that keeps popping up is the idea to freeze jugs of water instead of using ice in the cooler.   The problem with this idea is that jugs take up HUGE amount of space in the camp cooler, so unless you need to bring in your own water to a campsite, I'd never give up my cooler space for it.  Instead, I try to freeze whatever food I can that I am bringing, and then I also use the blue ice packs that can be bought relatively inexpensively.    I do all my camp food shopping a few days before I leave, and then prep what I can before I go and freeze whatever freezable - meats, chopped up onions and peppers, coffee cream, etc.  Sometimes I don't cut up onions ahead of time because they don't need to be refrigerated anyway and can be stored with the canned goods.

Bob Talbert's White Chili - serves 4

2 T vegetable or olive oil
1 1/2 lbs. boneless, skinless chicken breasts cut into 1-2 inch cubes
2 tsp ground cumin
1 tsp ground oregano
1/2 tsp Cayenne pepper, or to taste
1 large onion - diced small
3 cloves garlic
2 cans (14 oz. ea.) chicken broth
1 jar (48 oz.) Great Northern beans with liquid
1 can (3 oz.) chopped green chilies, with liquid
grated cheese, for topping

Heat a chimney of charcoal until the coals on top are gray, about 20 minutes.   Using tongs, take out about half the coal and put it in an even layer in the fire pit. Add some fresh coal to the chimney on top of the hot coals remaining.  When using a Dutch oven to brown meats or saute vegetables, it's not important to count how many.   Place the Dutch oven on the hot coals, and add oil to the pot.   Heat until oil is hot, and add chicken.  Cook while stirring, until chicken is about halfway cooked through, about 10 minutes and add spices, garlic and onion.   Saute until onions are soft, about another 10 minutes  Add remaining ingredients and stir.  The coals on the bottom will have cooled off somewhat - check with your hand to see if  they are still hot enough.  Move the oven off the coals and put your hand just above the coals and if you can hold it there for 5 seconds, it is still about 350 F.   If not, add 9 coals and spread them out, and cover the oven and put it on the hot coals.   Space 15 hot coals on top.   Cook for an hour, rotating the lid and the oven every 15 minutes to minimize hot spots.  Use welding gloves, pliers or a lid lifter to remove the lid - be careful not to drop ashes in the chili!  Top with grated cheese.

This recipe is outstanding anytime while camping, but it's especially great when the weather is a little chilly outside.   Campers will come from all over to ask you what you are cooking, it will smell so good! Next up, I'll share how to make something slightly more difficult in a Dutch oven, where the heat is more critical - breakfast!  Check out Mountain Man breakfast.


Saturday, June 15, 2013

Camping cooking techniques


Lately, I've been noticing all sorts of camping recipes and tips getting repinned on Pinterest, and most of them are just plain silly.  My personal favorite is this bucket fastened to a milk crate to be used as a toilet.   Really?  I can't picture hauling this monstrosity to a campsite....and what does one do after someone uses it?    This blogger recommends covering in in sawdust and using it as compost!  Nice....no thanks.  I've camped in many kinds of places, and even the most rustic offers some kind of pit toilet, which is fancy talk for an outhouse.   It might not be enclosed, but it is a place to do what you need to do.   If there's not one available, you can dig a hole....but I guess no one wants to pin that to Pinterest.  For some reason, people think the milk crate getup is cute or something.  

There's another pin that's getting a ton of play entitled 20 camping recipes that will make your mouth water, but the blogger must not camp (or cook) very much, because most of these recipes aren't very camp friendly.  She's planning on going on a 50 day camping trip this summer....I wish her luck.   There's lots of recipes that show a picture of a cast iron frying pan.  Why is it that  people think that a cast iron frying pan is "camping equipment"?   I love my cast iron frying pans, but leave them home!  Camping is the last place to bring one.    They are heavy and they will rust if kept outside.  Perhaps people envision cooking over an open fire with one, but it is actually not a good idea.   Cast iron retains heat, and it is really easy to burn food in one.

I have a feeling that most people on Pinterest are not really roughing it - they are probably "car camping" which gives you the opportunity to camp with a cooler and more cooking gear than you would on a backpacking trip.   Most of my camping is done this way - we have a pop up camper that our family uses, and for Boy Scouts, we travel with a camping trailer that has room for lots of gear to cook for lots of people at one time.   For Girl Scouts, we tend to stay in lodges but do lots of cooking outside.  For this type of camping, there's  really only 3 ways to cook - using a camp stove, grilling or in the campfire itself.  Using a camp stove is the easiest....anything you can make at home on the stove top can be made while camping.  It's also great to use to heat up water to do the dishes - a big part of camp cooking is doing the dishes,  plan ahead for it.   Before you even start cooking anything, start heating a large pot of water for the dishes. This is the best camping cooking tip I can give anyone!


Grilling is a technique most people are familiar with, but it's important to use an actual grill to do it on.   Not one of these contraptions. 


Setting a grate over a campfire and trying to cook on it is an exercise in futility.   Things will burn on the outside and be undercooked on the inside.   Again, it's not a good idea to set a cast iron frying pan on one of these either.    Most camping areas have grills and picnic areas - use one of the camp grills with charcoal and grill out just like you'd do at home.  

My favorite way to cook while camping is in the campfire itself.  Foods wrapped in foil, such as baked potatoes, can be cooked in the hot embers of the fire (not in a flames!).  My favorite ways to cook things over the fire are pie irons and a dutch oven. 
pie iron


dutch oven

Think of a pie iron as your own personal panini press to make any kind of hot sandwich, or individual meal.   The camping dutch oven is the workhorse of all camp cookery.  You can bake in it, cook soups and stews in it, fry in it, use its lid as a griddle.    It's my favorite way to camp cook.    In upcoming blog posts this summer, I will share some of my favorite camp cookery recipes.  But if you are looking for a great camping cookbook, I can suggest a couple of my favorites:


 Happy camping!

Sunday, April 11, 2010

Kneaded Bread vs. No Knead Bread - a comparison and some camping ideas

I've been reviewing a cookbook I got out of the library called Kneadlessly Simple by Nancy Baggett.  As I mentioned in an earlier post, this cookbook might be better named "Needlessly Complicated", but it does provide some valuable insight on making breads that rely on a slow rise as opposed to kneading.   I am convinced that all around, a kneaded bread recipe is easier to make, but I'd love to use no knead breads for camping.   I can mix things up ahead of time, and leave them in the cooler for their initial rise, and then in the sun for their second rise.  I'd like to make more breads in my camping Dutch ovens this summer.   Ms. Baggett suggests that any regular kneaded bread recipe can be transformed into a no knead bread recipe by comparing it to a similar recipe in her book and adopting some of the same techniques.   So I am going to try comparing my favorite white bread recipe with one of hers in the book.   Here's how the recipes compare - the KS technique requires a little less flour an a little more water.  Using the no knead technique, all of the dry ingredients are mixed together, and then they are mixed with the wet ingredients and stired.   The dough should be stiff, but sticky.   Cover the bowl, and it can be refrigerated for a while, and then left to rise for the first time for 15 - 20 hours.   For a camping trip, I could see mixing up the dough on a Thursday night, and then refrigerating it until it was time to leave.  Then, I'd put it in the cooler, and when we got to our final destination on a Friday evening, leaving the dough in the car to rise overnight.    Then, in the morning, I'd punch it down and cut the dough in half and let half rise during the day for dinner.  I'd put the other half back in the cooler and take it out before bedtime to rise again in the car for breakfast rolls the following morning.   Similarly, one could make one loaf one day and then save the other half in the fridge to make the next day.  I am wondering if the dough could be frozen before the second rise....my guess is that it could, but I am not sure.  I'll have to experiment!

For the baking part, for the KS recipe, preheat the oven to 425, then lower the temp to 400 F. Bake for 35 - 45 minutes, until the top is nicely browned.Cover the top with foil and make another 15 - 25 minutes, or until the tem reaches 208-210 F with an instant read thermometer.    The MS recipe is about the same....For Dutch oven cookery, I found a handy trick on this website:
  •   Virtually everything needs to cook at 350F, and here's the magic number 2 for Dutch oven cookery.
    •  2 coals per inch of oven diameter
    • place 2 more coals than the oven size on the lid, and
    • place 2 less than the oven size under it.
  • I have a 12 inch oven and and a 10 inch oven, so that would mean I would use 24 coals for the 12 inch oven, and then I'd put 2 more coals on top (14) and 2 less on the bottom (10)  
  • To successfully brown breads, however, you must alter the cooking process for the last five to eight minutes of the traditional 25-30 minute, 350° baking time.
    • Put a light coat of oil on the interior of a cool oven (including the lid), and let the rolls or bread complete their final rise in the oven prior to applying the coals.
    • Place the oven on the coals with the proper number of coals on top as noted earlier. Remember: no coals directly under the center of the oven.  Putting them under the center of the oven will make a hot spot and it will burn.  They should be placed 1 inch apart in a circle under the oven.
    • When there are five to eight minutes left in the cooking time, lift the lid, lightly brush the tops of the breads with butter, replace the lid, then take all the coals from under the oven and distribute them evenly on the top. With all the heat now on the lid, check the bread every couple of minutes until you think it looks perfect. After brushing the coals and ashes from the lid, remove it, tilt the oven over a bread board, and your perfect bread will gently fall out.
I can't wait for camping this summer!

Wednesday, August 26, 2009

Good things I have found lately....

Shopping at the not so famous farmer's markets around here

Every Tuesday evening this summer, I try to shop at our tiny Dexter Farmer's Market. The prices are great, and very often I am the only person shopping. It's next door to our new library, so I get to do two of my favorite things at the same time - shop for fruits and vegetables and check out library books. Every time I go the DFM, I try to buy something from everyone there. Right now, everyone basically has the same things - peppers, tomato, basil, etc. I bought some wonderful Santa Rosa plums that squirted juice all over the front of my work clothes. The gentleman that sold me the plums quickly got me a damp paper towel. I try to buy something each week off the high school girl who is saving for college. I bought cabbage off of a guy that recently lost his job. He presented me with a lovely bouquet of red zinnias because he values me as a loyal DFM customer. I was so surprised and delighted! They are on my desk at work.

Christopher Kimball's Letters From Vermont

Every so often, I get an email from Christopher Kimball from Cook's Illustrated. Granted, I am sure they are intended to be subtle advertisements, but I love reading them anyway, just like I love his essays each month at the beginning of Cook's Illustrated. I love hearing his stories of living in Vermont. Bonus: Evidently there now is a Cook's Country TV show on PBS. I am looking forward to checking it out.

Port Crescent and Sleeper State Park Camping

These are both in Michigan's Thumb. We camped last weekend at Sleeper and it was great. I can't wait to try Port Crescent - it is like camping right on the beach. We also bought some Candy Stick sweet corn that I froze, as well as 50 lbs of Michigan potatoes for $5. Why anyone bothers to grow potatoes is beyond me? They are so cheap to buy around here. I am hoping I can root cellar my potatoes for the winter by putting them in the garage. Last year I did that with pears and they lasted all winter.

Wednesday, July 01, 2009

Muskallonge Lake Camping Trip

We have just returned from our 4th of July camping trip 4 days early because of the rain and cold. The forecast for the U.P. for the rest of the week was rainy and cold, so we decided to come back home where the weather might be better. It's raining here in Ann Arbor, but it's about 20 degrees warmer at least, and the forecast is for sunny skies the rest of the week.

Weather notwithstanding, I totally enjoyed our camp site at Muskallonge Lake State Park. It wasn't crowded at all, and it is on Muskallonge Lake, noted for it's good fishing, and within walking distance of Lake Superior and great agate hunting. It was a lovely park, and next time, I would really like to reserve site 134 or 145. We had sitte 29, and it was great, too. This camp never seems to be full. It's located next to the Deer Park Lodge - I hope they don't mind that I borrowed one of their pictures for my blog. I don't have any great pictures except rainy ones. They run a great camp store with fishing equipment and licenses, camping equipment, etc. If you are not a camper, rent one of their cabins on Muskallonge Lake. Deer Park is located between Whitefish Point and Grand Marais in the U.P., near the Two Hearted River, made famous by Ernest Hemingway. It is in the middle of nowhere, which is a great place to be, except when it's rainy and cold for days on end. So we came home early....but we will go back for sure.

One rainy camp night dinner, I made flank steak. This is my friend Ann's really good recipe for marinated flank steak called "Mom's Tasty Flank Steak" which was her mother-in-law's recipe. It works out great in a Dutch oven while camping, but at home you could make it under the broiler.

Mom's Tasty Flank Steak

Marinade
1/2 c. soy sauce
1/4 c. olive oil
1/4 c. lemon juice - bottled is fine for this recipe
1 T. thyme
3 green onions, sliced
A big flank steak

Place marinade ingredients in a plastic bag, and add steak. Freeze in marinade, and pack it in your cooler. (if you are making this at home, marinate it in the fridge overnight) At camp, put the beef and marinade in a 12 inch dutch oven with 10 coals on the bottom, 14 on top for about 30 minutes. (at home, broil it in a pan with the marinade until desired doneness) Serve with noodles. Yummy!


Monday, May 25, 2009

Camper Cabin at Bruin Lake

This Memorial Day weekend, we camped a the camper cabin at Bruin Lake at Pinckney Recreation Area. If you don't have a tent, a camper cabin is a great way to start camping.....it's a 3 room structure...2 bedrooms and a common area with a futon. Ours had a coffeeee maker and a microwave, and a coffee maker. We have a popup camper, aka a tent trailer, but all the campsites were booked for the weekend.

You'll need to bring all your cooking gear - we're big on dutch ovens in our house - but there's a grill to cook on if you don't want to bother. Here's some dutch oven recipes for you to try:

Dutch Oven Potatoes

10 inch oven
6 Russet potatoes, cut in 1 inch cubes
4 cloves garlic, minced
kosher salt
olive oil
Heat 22 charcoal briquets (cheapest you can find) until they're gray. Cook for 30 minutes in a dutch oven with 8 charcoals on the bottom, 14 on top.

If you have any left over, use them the following morning for

Mountain Man Breakfast
1 lb bacon, diced
1 green pepper, diced
4 cloves garlic
1 onion, diced
1 dozen eggs
Leftover potatoes and cheese
salt and pepper

Heat 30 briquets in a charcoal chimney until gray. Put 8 on the bottom of of your grill, and cook bacon until brown/ Add 8 more coals, and vegetables, cook until soft. Add one dozen eggs, scrambled, with cheese and potatoes, salt and pepper and replace lid. Top with 14 coals and cook for 20 minutes or until eggs are done.

Sunday, February 22, 2009

Swiss Steak - local style

Locavorious, which is an Ann Arbor based company that has partnered with several small farms in the communities around Ann Arbor, offers frozen produce subscriptions, similar to shares offered by community supported agriculture (CSA) farms. During the peak harvest, they prepare and package local produce at its peak freshness, and preserve it in a community freezer. I got a pound of their frozen tomatoes from my fellow Michigan Lady Food Blogger Rena and promised to create a recipe with them. So yesterday, I made Swiss steak. Swiss steak isn't a native dish from Switzerland, rather, it refers to the way you can tenderize a tough cut of meat by sprinkling it with flour and pounding it with a meat mallet. I didn't physically "swiss" this steak because I had some top sirloin steak from TMZ Farms in my chest freezer and thought it would be tender enough without the added step.

This recipe would be wonderful in a crock pot - cook it on low for 8 hours. It also would be a terrific camping recipe in a cast iron dutch oven. To make it while camping, cut the beef into 2' chunks first and cook with 8 coals on the bottom, 14 on top for about 40 minutes, rotating the lid and pot every 15 minutes or so. Locavorious' tomatoes were from Tantre Farm. The other ingredients could have been locally grown carrots and parsnips which I could have kept in my suburban root cellar. This year, I checked out a great book about root cellaring from the library and was motivated to give it a try. I "put some food by' - a half peck of apples and pears that I bought from a roadside stand in Romeo last fall by putting them on a shelf on an interior wall of my attached garage. It worked beautifully! They stayed fresh and crisp and didn't freeze. Next year, I will preserve root vegetables, probably in a box of sand in my garage, too. My potatoes were from DuRussel potato farm and can be purchased at groceries throughout Michigan.

Swiss Steak

1 lb. frozen whole tomatoes
3 peeled carrots, cut in 2 inch chunks
3 peeled parsnips, cut into 2 inch chunks
3 medium sized potatoes, cut in quarters longitudinally
1 onion, peeled and quartered
2 lbs top sirloin seak
1 bottle of your favorite local beer (I used homebrew)
1 1/2 c. vegetable juice (make your own or use V8)
1 t. dried rosemary
kosher salt
fresh ground pepper

Hot cooked noodles

Preheat oven to 300 F.

Put vegetables in the bottom of a 6 qt. dutch oven, and place meat on top. Pour beer and vegetable juice on top, sprinkle with rosemary, salt and pepper to your personal taste - I recommend a tablespoon of kosher salt and a teaspoon of pepper. Cover and cook in oven for 2.5 hours. Serve beef over hot cooked noodles with vegetables on the side and sauce ladled over the top.

Monday, September 01, 2008

Top 10 camping supplies

We're just wrapping up our first summer as regular campers. In years past, we might have camped once a year or so, but this summer, we've gone many times, thanks to our new gently used popup camper and having kids in Scouts. This past weekend, we camped at Algonac State Park, and it was just okay. It's a little more crowded than I would prefer, and it doesn't have a lot of trees. Between the two campgrounds - Riverfront and Wagon Wheel, I think I would prefer Riverfront, because we got to see many freighters making their way up or down the St. Clair River. The Wagon Wheel campground has more trees, but less things to see. Both are a little too dense with people for my taste.

During this camping trip, I was reviewing all of my camping supplies and thinking about the stuff that I have always packed in the camper that are really "must haves". Here is what I came up with:

1. Wide width heavy duty aluminum foil. Foil can be used in a million ways for camp cookery. You can make individual foil packs of meat and potatoes to cook in the hot coals. I never cook in a dutch oven without first lining it with foil. Foil is a camping necessity. Never buy regular weight foil for either home or camp, it will just get holes in it easily. Always get wide width, which can be made smaller if you need it.

2. An electric kettle. One thing about camping is it always requires hot water, and lots of it. Even if you are tent camping, it is nice to have an electric kettle if you are camping in a spot that has power. Besides for doing dishes, hot water can be used with a French press style coffee pot to make coffee first thing in the morning, which is a must for me.

3. Books. Camping is the perfect time to get some reading done, especially about Michigan when I am camping in Michigan. This summer, I finally read "Anatomy of Murder" by Robert Traver while camping in the U.P. I am sure Voelker would have been proud!

4. Crocs. There are no better shoes for camping than Crocs. They are so comfortable to walk around camp in. You can leave them outside the tent, and if it rains, it doesn't matter, they can be dried with a towel. Canoeing? Crocs float. I have found that the cheap Crocs knockoffs aren't as durabile as the real thing.

5. Rain poncho. If it rains, you won't care if you packed a rain poncho. Put one in your camp box for each member of the family.

6. Mancala. We keep a Mancala set in our camper. It's our favorite camping game.

7. Dutch oven. Indispensable for camp cookery, I have two of them now. We love them both - make sure to get the Lodge brand. They are worth it - their sides and bottom have a uniform cast iron thickness.

8. Charcoal chimney. You'll never need to use lighter fluid again. I own a couple, my favorite is the Weber one that is a little more sturdier than the bargain brands.

9. Jiffy mix. You can make a gazillion camping meals with Jiffy Mix and some water.

10. Butane lighter. Too many nights with soggy matches convinced me that a trigger lighter is required for camping.

I'm looking forward to some fall camping...

Sunday, June 22, 2008

Camping at Metamora-Hadley Recreation Area

Metamora-Hadley is in Lapeer County, and it's a lovely campground. My favorite so far this summer! We camped the weekend of June 13, but I am just getting around to writing about it. We camped close to Lake Minewanna. It had a wonderful sandy beach and has boats that can be rented. It has an operating camp store that sells ice cream cones and rents out recumbent bikes. Despite the crowded conditions, it was relatively quiet. Next year, I'd prefer a site right on the lake. Our friends live in nearby Oakland Township, so they came out and joined us for dinner. I experimented with a pork tenderloin in the dutch oven, and it was great! Here's my recipe:

Camping Pork Tenderloin

2 pork tenderloins, sliced in 1" thick slices
6 cloves garlic
1 lb new potatoes, cut in half
1 small bag baby carrots
1 Vidalia onion, sliced
Greek Seasoning
about a glass of white wine....whatever you happen to be drinking would be fine. Beer would work, too

Put all the veggies and garlic in the bottom of a 10 inch dutch oven that's lined with aluminum foil, layer with tenderloin slices. Sprinkle with Greek seasoning - I keep a container of it in the camping box. It's a great all purpose seasoning. Cook with 8 coals on the bottom, 14 on top for about 40 minutes, rotating the lid and pot every 15 minutes or so. Feeds 4 hungry adults and 4 hungry middles schoolers.

Monday, May 26, 2008

Camping at Portage Lake Campground

Our second trip with our newly purchased gently used Viking pop up camper was to Waterloo Recreation area's Portage Lake Campground. This was a really nice campground - it was crowded but quiet. We were in campsite 122, but next year, I'll have my eye on site 114, which was fairly secluded. On a list I am on called arborparents, people are complaining that there are no intergenerational experiences anymore, but camping definitely is one. There was retirees, people with babies, teenagers, young lovers, and it is multicultural, too. This was evidenced by the large group of Indian families that had set up camp across from us. The smell of their cooking almost had me begging for a sample!

I tried Campfire Popcorn again, this time with no oil, and the corn caught on fire in the foil. I will not give up until I master this camping recipe. I precooked Alton Brown's ribs, and finished them off on the Weber Smoky Joe. I also made some great food in my new Lodge 10" Dutch Oven. Love this thing! A great experiment I tried in it was Monkey Bread, using homemade refrigerator roll dough, instead of biscuits in a tube. Here's the recipe I used for the dough - i mixed it up at home and stored it in the cooler.

Mom's Camping Bread Dough

1/4 cup sugar
3 tablespoons vegetable shortening
1 1/2 teaspoons salt
1 cup milk
2 t. bread machine yeast
3/4 cup lukewarm water (105 to 115 degrees)
1 egg, beaten
4 to 4 1/2 cups all-purpose flour, divided

In a large bowl, combine sugar, vegetable shortening, and salt; stir until well blended. In microwave, scald milk; pour over sugar mixture. Cool to lukewarm (105 to 115 degrees F).
In a small bowl, combine yeast and water; stir until yeast is dissolved. Mix in egg until well blended; stir into milk mixture.

Add 2 cups flour. Gradually stir in as much of the remaining flour as dough will absorb, mixing well. Place dough into a well-greased plastic container, cover with saran wrap and a rubber band. Put this in your camping cooler 8 hours but no longer than 5 days.

Dutch Oven Monkey Bread
1 batch bread dough
2 T. cinnamon and 1/4 c. sugar mixed together
1/2 stick butter

Line 10" oven with aluminum foil, and melt butter over hot coals. Divide dough into 1" balls, roll in melted butter and then in the cinnamon sugar, line bottom of oven with balls. Cook over 8 coals bottom, 14 on top for about 1/2 hour, rotating top and oven 1/4 turn every ten minutes or so.

Sunday, May 18, 2008

Girl Scout Camp

This past weekend, I camped at Camp Linden, which is the campground owned by the Girl Scouts of Huron Valley. I guess that means it is owned by me - it's my own private campground - because I am an adult member. I was a Girl Scout as a girl, and my daughter is now one. Every troop that wants to camp has to have a certified adult troop camper that has been trained by the Girl Scouts. That's me! I wanted to volunteer, but being a leader is a big time commitment. The other adult volunteer opportunity is troop first aider, and wisely I let this one pass. Jennifer, our first aider, is great with that role.

When I signed up to be a troop camper, I wondered why 9 hours of training is needed to be troop camper, but when I arrived at Camp Crawford (GSHVC's other camp) I learned that many of the volunteers had never camped before. Some don't even cook for their families on a regular basis! The goal of being a troop camper is to teach the girls how to camp, and to quote my instructor, "There's camping, and then there is Girl Scout Camping." So even though I had camped many times before, I had to learn the Girl Scout approach to camping.

I learned that Girl Scouts leave no trace, so that means no using accelerants on your campfire or charcoal fire. It means not using sticks for your S'mores, you need to use a metal skewer. It means using a mess kit, instead of paper plates. I learned about how to implement a kaper chart (post a comment with your email address and I'll send you my kaper chart and schedule) and schedule activities and keep the girls on task. The challenge to GS camping is to make sure the girls do everything themselves, even though it would be 10 times (make that 100 times) easier to do it yourself.

We've come a long way since we camped at Camp Hilltop as Brownies. The lodge there burned down in 2006 and the campground has been sold to the city of Ann Arbor. The most difficult recipe we made that year were pizzas on white bread in a pie oven on the campfire. This year, the girls decided that the kaper chart was "plan B" and wanted everyone to work on every task. We moms know that this doesn't work very well - whatever is everyone's job soon becomes no ones job. They handled it pretty well...only a bit of squabbling.

What did they cook? They made an entire dinner of vegetarian lasagna, rolls, beef stew and pineapple upside down cake in dutch ovens, and it all came out well. The stew could have used some more time on the fire. We experimented with some new things, and here is what didn't work:

Campfire Popcorn - the oil leaked out and caught on fire. The small amount of corn that popped was singed. Luckily the campfire smoke cancels out the burnt popcorn smell, which as we all know from our workplace office kitchenette experiences is one of the worst smells ever.

Paper Bag Breakfast - bags caught on fire, bacon took too long to cook and once it did, it welded itself to the bottom of the bag. Egg was raw.

...and here is what did:

Egg on a Stick - I love this guy's description of the process, including the part about Mississippi and grandma. The only thing we did different is we used metal skewers, which I think helps the egg cook on the inside. Of all the things we tried, this one I thought for sure was a failure, but it was a success. I kept pulling the skewer out a little to see if it was done - as soon as the egg can rotate on the skewer, it's cooked. Use older eggs so the shell doesn't stick. You end up with something like a hard (or soft, if you'd rather) boiled egg.

Sunday, May 11, 2008

Hayes State Park - Irish Hills

We went this weekend and had a great time. It wasn't crowded (but I could see that it could get crowded during the MIS season) and the sites were all pretty nice. They have some fishing docks, and the kids got to go fishing, plus there's all the Irish Hills kitschy stuff like the Mystery Hill (and it's AMAZING FORCE OF GRAVITY) and mini golf etc. to visit. It is near MSU's Hidden Lake Gardens, which we didn't visit, but I'd like to do so sometime. We had lunch at Jerry's Pub on Wamplers Lake on the deck, and the food was good and the view was wonderful. It was a sunny warm day - perfect for an Oberon, which we had.

For dinner, I tried Dutch oven cookery, because we're going to be doing it next weekend at Girl Scout camp. Our service unit has cast aluminum ovens - I am wondering if it is easier to burn food in aluminum, because I burnt the pineapple upside down cake I tried to make. Then again, the recipe said 8 coals on the bottom, 14 on top and I put way more than that on top and bottom. My bad! I invented the beef stew recipe I followed - and it came out pretty good:

Mom's Camping Beef Stew
1 lb new potatoes, cut in half
3 cloves garlic, slivered
1 lb baby carrots
2 lbs. beef stew meat
1 onion sliced
3 cans beef broth
(add one bottle beer if you are not camping with Girl Scouts)
salt and pepper
Spring of rosemary or a couple bay leaves

Stuff to add later:
small bag of frozen peas
1/2 c. flour and enough water to fill a cup

Heat a charcoal chimney with about 20 briquettes of charcoal. While it is getting hot, line the inside of the dutch oven with aluminum foil, and add ingredients in the order listed. Cook with 10 coals on the bottom and 14 on top for one hour, check to see if potatoes are soft and beef tender. I was using a 12 inch oven. The general rule of thumb to produce about a 350° heat is to take the size of the Dutch oven in inches, double the number, and use that many total briquettes. Add peas and flour water and stir, replace lid and cook for another 10 minutes or so. Make sure not to drop ash in your pot!