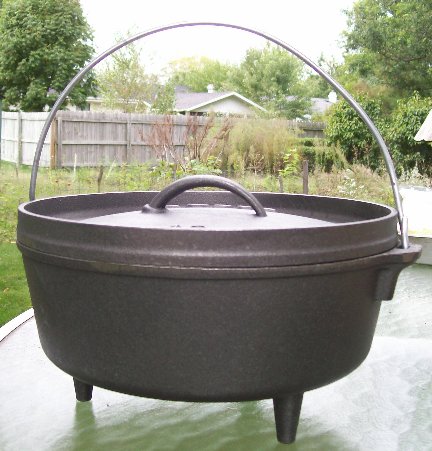
Camping Dutch ovens are different from the one you might have in your kitchen - they have legs, a lid with a rim and a bale type lid. For camp cooking, I like a Lodge preseasoned Dutch oven - they are ready to use and are made of cast iron for excellent heat transfer. It's essential to use charcoal briquettes to adequately control the temperature - anyone that's had a bad experience from Dutch oven cookery can tell you it's really easy to burn food in one. Cast iron retains heat really well. Buy charcoal that is in briquette form and has not been treated with accellerants; store brands work just fine and are relatively inexpensive. Also it's essential to use a charcoal chimney
 to get the coal hot.

I first learned about charcoal chimneys from Alton Brown and they are an excellent tool for grilling and camping - to get the coals hot, just fill it up and crumple 2 sheets of newspaper under it and light. In about 20 minutes or so (could be longer if it is damp out) the coals will be gray and hot and ready for cooking. A couple other things that are nice to have for Dutch oven cooking are a lid lifter
 and welding gloves
 , although a pair of pliers and oven mitts can be used to open the lid and hold the handle.
 To control heat during Dutch oven cooking, it's important to count charcoal - I like to use the "Dutch oven rule of 3". The amount of coal needed is 2x the diameter of the oven (usually cast in the lid) - for a 12 inch oven it's 24. Since heat rises, you need more heat on the top than the bottom, so put 3 more coals on top than on the bottom; i.e. 15 on the top and 9 on the bottom. This will give you a temp of about 350F, which is what most foods are cooked at in an oven. A batch of coal on the oven will stay hot for about 30 minutes - if you are cooking a recipe that needs more time, you will need to refresh the coals. There are many theories for how to arrange the coals under the oven and on top; I find evenly spacing them works fine, as shown above. The goal is to minimize hot spots. During cooking, rotate the oven a quarter turn clockwise on the bottom coals and rotate the lid counterclockwise a quarter turn every 15 minutes to insure even heat distribution.
The best type of recipe to start out with is a chili, soup or stew, because it's very forgiving and hard to burn. A good recipe to start out with is my white chicken chili recipe. Also, it's time for me to debunk some popular posts on Pinterest about camping. One I keep seeing is this tip to store camping spices in Tic Tac containers.

Whoever wrote this original tip must have a serious Tic Tac addiction and must not cook very often in real life! This is more Tic Tacs than I personally have eaten in a lifetime....but even more problematic is that it would be difficult to get the spices out of the containers using the little Tic Tac hole, and who wants their spices to taste minty? Lastly, the volume of a Tic Tac box just isn't feasible for a lot of spices - sure, maybe nutmeg or cayenne might work in such a small container, where only a small amount is needed for a recipe, but for other things like chili powder, oregano, garlic powder, that amount might not even be good for one recipe. I store camp spices individually in zip lock bags - the snack size work great! I put all of my spice baggies into a plastic Glad container. So skip the Tic Tacs....
The other Pinterest favorite that keeps popping up is the idea to freeze jugs of water instead of using ice in the cooler. The problem with this idea is that jugs take up HUGE amount of space in the camp cooler, so unless you need to bring in your own water to a campsite, I'd never give up my cooler space for it. Instead, I try to freeze whatever food I can that I am bringing, and then I also use the blue ice
 packs that can be bought relatively inexpensively. I do all my camp food shopping a few days before I leave, and then prep what I can before I go and freeze whatever freezable - meats, chopped up onions and peppers, coffee cream, etc. Sometimes I don't cut up onions ahead of time because they don't need to be refrigerated anyway and can be stored with the canned goods.
 Bob Talbert's White Chili - serves 4
2 T vegetable or olive oil
1 1/2 lbs. boneless, skinless chicken breasts cut into 1-2 inch cubes
2 tsp ground cumin
1 tsp ground oregano
1/2 tsp Cayenne pepper, or to taste
1 large onion - diced small
3 cloves garlic
2 cans (14 oz. ea.) chicken broth
1 jar (48 oz.) Great Northern beans with liquid
1 can (3 oz.) chopped green chilies, with liquid
grated cheese, for topping
Heat a chimney of charcoal until the coals on top are gray, about 20 minutes. Using tongs, take out about half the coal and put it in an even layer in the fire pit. Add some fresh coal to the chimney on top of the hot coals remaining. When using a Dutch oven to brown meats or saute vegetables, it's not important to count how many. Place the Dutch oven on the hot coals, and add oil to the pot. Heat until oil is hot, and add chicken. Cook while stirring, until chicken is about halfway cooked through, about 10 minutes and add spices, garlic and onion. Saute until onions are soft, about another 10 minutes Add remaining ingredients and stir. The coals on the bottom will have cooled off somewhat - check with your hand to see if they are still hot enough. Move the oven off the coals and put your hand just above the coals and if you can hold it there for 5 seconds, it is still about 350 F. If not, add 9 coals and spread them out, and cover the oven and put it on the hot coals. Space 15 hot coals on top. Cook for an hour, rotating the lid and the oven every 15 minutes to minimize hot spots. Use welding gloves, pliers or a lid lifter to remove the lid - be careful not to drop ashes in the chili! Top with grated cheese.
This recipe is outstanding anytime while camping, but it's especially great when the weather is a little chilly outside. Campers will come from all over to ask you what you are cooking, it will smell so good! Next up, I'll share how to make something slightly more difficult in a Dutch oven, where the heat is more critical - breakfast! Check out Mountain Man breakfast.


 is the easiest....anything you can make at home on the stove top can be made while camping. It's also great to use to heat up water to do the dishes - a big part of camp cooking is doing the dishes, plan ahead for it. Before you even start cooking anything, start heating a large pot of water for the dishes. This is the best camping cooking tip I can give anyone!


