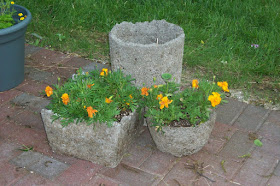
What is hypertufa? It's a simulated rock used to make planters. Evidently it was made popular by alpine gardeners, who used to use antique animal watering troughs for a rustic look, but they became rare and expensive. Historically, it's been used since the 1800s in England to make the troughs. They are light and easy to move around.
The recipe for hypertufa is simple:
3 parts peat moss
3 parts perlite
2 parts Portland cement
Mix these 3 together, and then add enough water to make it look like cottage cheese. Wear rubber gloves! Portland cement is very caustic. Use another planter as a mold - I had good luck using plastic planters or buckets. The cement stuck to a wood barrel I tried to use as a mold. I think plastic works well, because it keeps the outer surface wet enough to get it out of the mold easily, and it is flexible so you can give it a gentle tap to help get it out. Square containers were easier to get out of the mold than round ones. Spray the inside of the container liberally with cooking spray (like Pam) to act as a mold releasing agent. Apply the hypertufa to the inside of the container about 2 inches thick. Make sure the thickness is uniform - watch out for thin spots. Add a drainage hole by pushing your finger down in the center of the bottom. Let it dry in the mold for 48 hours, or until it feels dry when you touch it. Don't go longer than 48 hours or it will be hard to get out of the mold. Carefully unmold it by turning the put upside down and tapping it gently. Sometimes, I had to use a butter knife to ease it out around the top edges. The hypertufa will be very fragile at this time, so don't touch it once it is unmolded. The inside of it is dry and the outside of it will be very wet, so it's prone to breaking. Don't try to move it. Let it cure for a couple of weeks in this position. I leave them upside down in the garage to cure, so they don't get rained on.
It took me many trials to get the hang of hypertufa. I probably broke half the ones I made at first. It's important not to make the container too big or too thin. I wouldn't recommend anything bigger than 1 ft in any dimension (width, height or base) otherwise it needs reinforcement of some kind. I read online that polymer fibers can be used to reinforce bigger containers, but haven't been able to find any at craft stores or hardware stores. Concrete dyes can be added to make colored ones, but I like the rustic stone look best. Hypertufa is a great garden project for March or April, when all gardeners have spring fever and it's too early to plant. It felt good to actually be doing something to prepare for the season. I am looking forward to making more next spring.
Heirloom Seed Trial Update:
I planted what I had left of 'Grand Rapids' lettuce and and the picking cukes in one of my hypertufa planter molds on June 1. I also threw in some watercress seeds I had that aren't part of the seed trial Looks like I've got something growing today, June 5!
I also planted the 'Kentucky Wonder' pole beans again - my first batch was planted in a hypertufa planter that fractured when I tried to move it. It was too big and too thin. Today, there's nothing showing yet...
The 'Sangiovese Ameliore' lettuce and 'Cincinnati Market' radishes are splendid.....
....as are the dwarf gray sugar peas. It is alleged that they don't need a trellis, but I am unconvinced at this point. Wait and see! Happy gardening this week....


Dear Cynthia,
ReplyDeleteYour hypertufa stuff sounds really good. How big a container can I make with it though? A plastic bucket would be the smallest I need. going up to a cube of 25" (60cm) length.
Thanks for sharing your knowledge. I think that is admirable.
All the best,
Heidi
(Library Community Garden,
London, UK)
Glad you like it Heidi! I wouldn't recommend anything bigger than 1 ft in any dimension (width, height or base) otherwise it needs reinforcement of some kind.
ReplyDelete
ReplyDeleteVery pretty. This could really dress up your garden and yard. And you can save a lot of money by creating your own.