Saturday, May 24, 2014

Garden Update: Hardening off


Today, I put my seedlings out to harden off, finally.  It was so cold last weekend, and I was so busy, I didn't bother.   Here's where I think I stand with the seed starting:


  • 12 Starlight Echinacea plants - I already have a ton of echinacea in my garden; it self seeds to wild abandon! I am hoping to get some different color out of these Renee's Garden seeds, but they may look like the pink ones I already have.  
  • 0 Matt's Wild Cherry tomatoes - I got these from Johnny's Seeds.  Epic fail
  • 6 Jasper - these did the best out of all my tomato starts....from Johnny's.   They are cherry tomatoes that are supposed to be fairly blight resistant.  I had horrible late blight last summer
  • 5 Mountain Magic - also did all right, these are full size tomato from seeds from Johnny's
  • 8 TBD tomatoes - I lost track of what these are - I think they might be more Jasper.
  • 10 Lavender Vincenza - these were from Fedco.  They did much better than...
  • 6 Lavender Munstead - from Johnny's.   
  • 26 Mexican Sunflowers - from Johnny's, I almost killed them when we went to Nashville last month and I forgot to water them before I left. I got these from Fedco.
  • 14 Exotic Love Vine...i.e. Spanish Flag...or Firecracker Vine  - I grew these years ago and they did great.   I'm going to have to build a trellis or something for all my climbers I have.  These were from Renee's Garden.
  • a couple mallow plants - Old seeds I had kicking around
  • some moonflower starts in the egg carton and take out food containers - I will put these down by the mailbox with my morning glories


Looking at my seed bill  from Johnny's, which doesn't show the additional $7 in shipping I paid, you can see that they weren't cheap.  My total was $25, and it looks like I got 43 plants total out of the deal, so I guess I paid 58 cents per plant, not counting the seed starter and the potting soil.   I have too many tomato plants for what I will actually need, which is 8. It's definitely not cheaper for me to start my own plants from seeds; I do it so I can get more varieties.

Saturday, May 17, 2014

Prom Cookies

Tonight, it's Dexter High School's prom.   For the first time in history, it will be held outside of the school.   The venue is the U of M Football Stadium, which is pretty exciting!  I signed up to the a chaperon, and I get to monitor the students when they tour the football field and the locker rooms.   I figure I will never have the chance to be on the the football field in my life, so I am going to check it out!  The theme for the prom is "Under the Stars" and so we were asked to make star shaped cookies and decorate them in blue, white and silver, which are the prom colors this year.


I had a bunch of cream cheese in the fridge so I looked around the internet for  a cookie recipe that used it and I found this one on Taste of Home's website.   Boy, I sure miss the the old style TOH magazine that featured family style recipes from home cooks and no advertising.  That magazine has totally sold out and has become nothing but a marketing opportunity for food companies.  I am always buying vintage TOH cookbooks whenever I can find them at garage sales.

Old School TOH

I'm betting this recipe came from the old days, when all of their recipes were winners! You can trust recipes made from women with hair like that!   I modified it to use my stand mixer, but the recipe was originally written to be mixed by hand.   Here's how I made them:

Cream Cheese Cutouts
1 cup butter, softened
3 oz cream cheese, softened
1 cup sugar
1/4 teaspoon salt
1 egg
1 teaspoon vanilla extract
2-1/2 cups all-purpose flour

In the bowl of a stand mixer, cream butter, cream cheese, sugar and salt until light and fluffy. Beat in egg and vanilla, using the paddle attachment.  Gradually beat in flour. Refrigerate, covered, 1-2 hours or until firm enough to roll. Preheat oven to 375°. On a lightly floured surface, roll dough to 1/8-in. thickness. Cut with floured cookie cutters. Place 1 in. apart on ungreased baking sheets. Bake 7-8 minutes or until edges are lightly browned. Cool on pans 1 minute. Remove to wire racks to cool completely.  Makes about 2 dozen large or 4 dozen small cookies.

The challenging part of making these cookies is actually getting the icing the right texture for this type of decorating, called "flooding".   You can use a icing bag with a Wilton #3 tip, but what I have found works perfect for large cookies like these (2 inch diameter) is a plastic mustard and ketchup squeeze bottle....like this: 


They are easier to fill than an icing bag.  Note that for more delicate cookies or for smaller dots, I'd use the icing bag and a smaller gage tip.  


Royal Icing Recipe

Ingredients:

3/4 cup warm water
5 T meringue powder
1 teaspoon cream of tartar
2.25 lbs powdered sugar

Directions:

In mixer bowl, pour in the warm water and the meringue powder. Mix it with a whisk by hand until it is frothy and thickened…about 30 seconds. Add the cream of tartar and mix for 30 seconds more. Pour in all the icing sugar at once and place the bowl on the mixer.  Using the paddle attachment on the LOWEST speed, mix slowly for a full 10 minutes. Icing will get thick and creamy. Add just drops of water at a time to make the icing runnier.  If you add too much water at a time it’s more difficult to thicken it with icing sugar than it is to add water to it.  To make sure the icing is the right consistency for flooding, try the “10 second rule”.  Drag a butter knife through the surface of the icing and count to 10.  If the icing surface becomes smooth in anywhere between 5-10 seconds, then the icing is ready to use.  If it takes longer than approximately 10 seconds, the icing is too thick.  Slowly add more water.  If the icing surface smooths over in less than 5-10 seconds, it is too runny.  Mix the icing longer or slowly add more sifted icing sugar to thicken it.

Cover the bowl with a dampened tea-towel to prevent crusting and drying.    The best website I've found about how to do the decorating is this one....after some practice, I got the hang of it.  Give yourself at least a couple days to make cookies like this, because they need to dry overnight.   Happy baking!


Sunday, April 20, 2014

Hummingbird Rose Cake

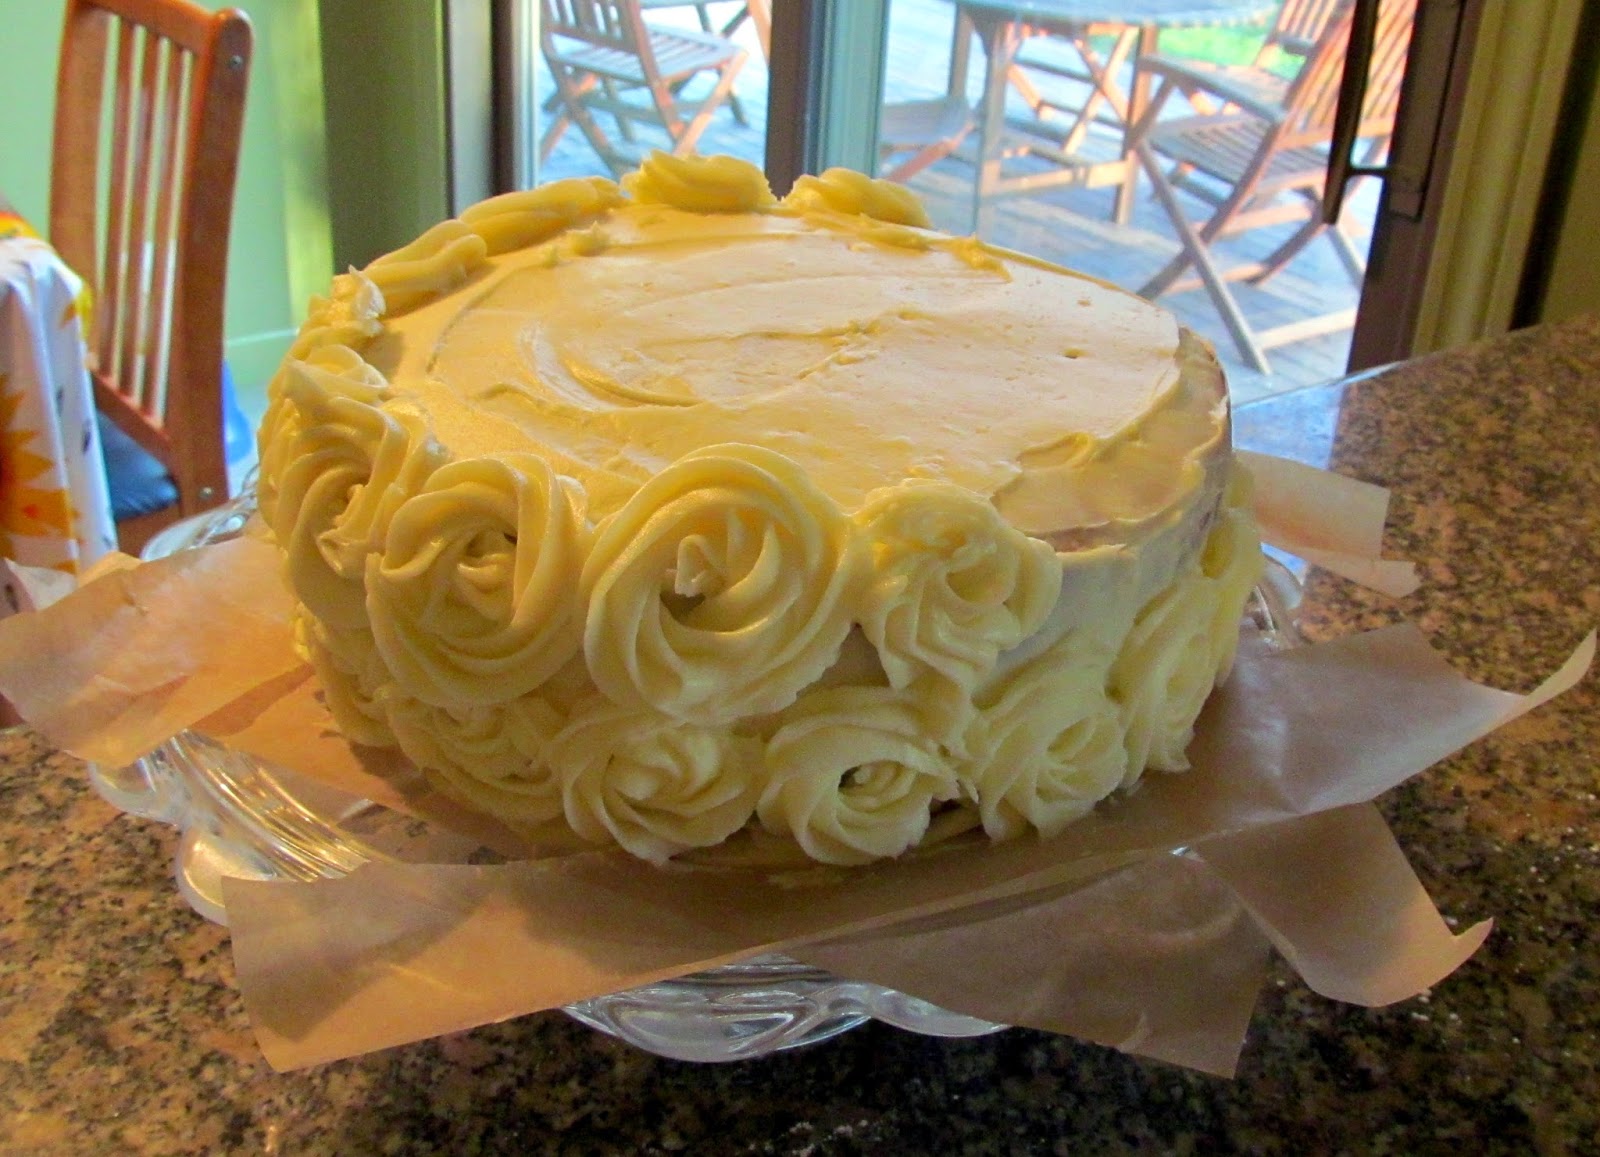
I'm not the world's best cake decorator, but ever since I was turned on to the rose cake by my friend Dottie I wanted to try it, because it is so beautiful. She made one for the band boosters bake sale that we all were raving over.  Also, I had once sampled the classic Southern hummingbird cake at Zingerman's Roadhouse, and I always knew I wanted to try it at home.  Then this month's issue of Cook's Country featured a recipe for it, so I decided to give it a shot.   It is both delicious and beautiful to look at!


I adapted the Cook's Country recipe a little bit for what I had on hand.I didn't have any overripe bananas but found some red bananas on the clearance rack at Meijer.  They worked perfectly and had a very banana-y taste.   Note that a rose cake requires a lot of frosting, and that the frosting needs to be pretty firm or it will slide off the cake.   I wasn't sure if cream cheese frosting would hold up, but it worked great.   I refrigerated the cake until serving time just to make sure.


Cake
1 (20-ounce) cans crushed pineapple in juice
3 cups (15 ounces) all-purpose flour
2 teaspoons baking powder
1 teaspoon baking soda
1 teaspoon ground cinnamon
1 teaspoon salt
2 cups (14 ounces) granulated sugar
3 large eggs
1 cup vegetable oil
4 very ripe large bananas, peeled and mashed (2 cups)
1 1/2 cups pecans, toasted and chopped
2 teaspoons vanilla extract

Frosting
4 sticks  unsalted butter, softened
16 cups confectioners' sugar
3 T vanilla extract
2 teaspoon salt
4 (8-ounce) bricks cream cheese, chilled and each cut into 20 equal pieces


Adjust oven rack to middle position and heat oven to 350 degrees. Grease 2 light-colored 9-inch round cake pans, line with parchment paper, grease parchment, and flour pans. The recipe said to drain pineapple in fine-mesh strainer set over bowl, pressing to remove juice. Pour juice into small saucepan and cook over medium heat until reduced to 1/3 cup, about 5 minutes; set aside, but I barely had 1/3 cup juice so I didn't bother.  Whisk flour, baking powder, baking soda, cinnamon, and salt together in bowl. Whisk sugar and eggs together in separate large bowl; whisk in oil. Stir in bananas, pecans, vanilla, drained pineapple, and reduced pineapple juice. Stir in flour mixture until just combined. Divide batter evenly between prepared pans and smooth tops with rubber spatula. Bake until dark golden brown on top and toothpick inserted in center comes out clean, 50 to 55 minutes, rotating pans halfway through baking. Let cakes cool in pans on wire rack for 20 minutes. Remove cakes from pans, discarding parchment, and let cool completely on rack, about 2 hours.

To make the frosting, using stand mixer fitted with paddle, beat butter, sugar, vanilla, and salt together on low speed until smooth; continue to mix for 2 minutes, scraping down bowl as needed. Increase speed to medium-low, add cream cheese 1 piece at a time, and mix until smooth; continue to mix for 2 minutes.  If you have a small mixing bowl, you can split it into 2 batches.


Put a little smear of frosting on the stand to hold the cake down. Place 1 cake layer on cake stand, and put some strips of waxed paper under the edges to keep your cake stand from getting frosting all over it.  For the center filling, frost the cake with about a 1/2 inch thick and put the tip layer on.   Apply a thin coat of frosting over the surface of the cake, also known as a "crumb coat", by the serious cake decorators, of which I am not!


Now, for the decorating part....I was nervous about it but this was super easy to do!  To make the roses, you need the Wilton 1M tip, and I was able to find it at Meijer in a set of extra large tips, but it is easy to find online.  It's an extra large tip, so it doesn't fit with my standard coupler, but you can cut the tip off the icing bag and just stick it in.   I have yet to find an easy way to fill a piping bag....it's always a mess for me, even though I fold down the top over my hand or use a cup to hold it.  This is where I wish I was Martha Stewart and had an assistant that would have to do it for me! Once you are ready,try making a practice rose.  All you have to do is start in the center and swirl outward....while squeezing the bag..like this...


Be sure to end your flower on the top, because the next layer of roses will cover it so it doesn't matter if it looks good at the end or not.   Start your line of roses at the bottom of the cake...


...try to stagger the roses in between the 2 below it, and when you get to the top, try to get half the rose on the top of the cake and half on the side.  Always try to fill all the gaps, but if you end up with some, you can fill the holes by piping some more frosting in the direction of the swirl.  I found that counter clockwise worked the best for me.   If you end up with a crappy looking rose; don't despair.  When the cake is done it will look fine.   Just keep on piping!

I'm not a great cake decorator, but I think this cake came out beautiful.  I am going to experimenting with my other extra large tips, and maybe with my favorite icing recipe Swiss meringue.   It couldn't be easier!  Happy Easter everyone...